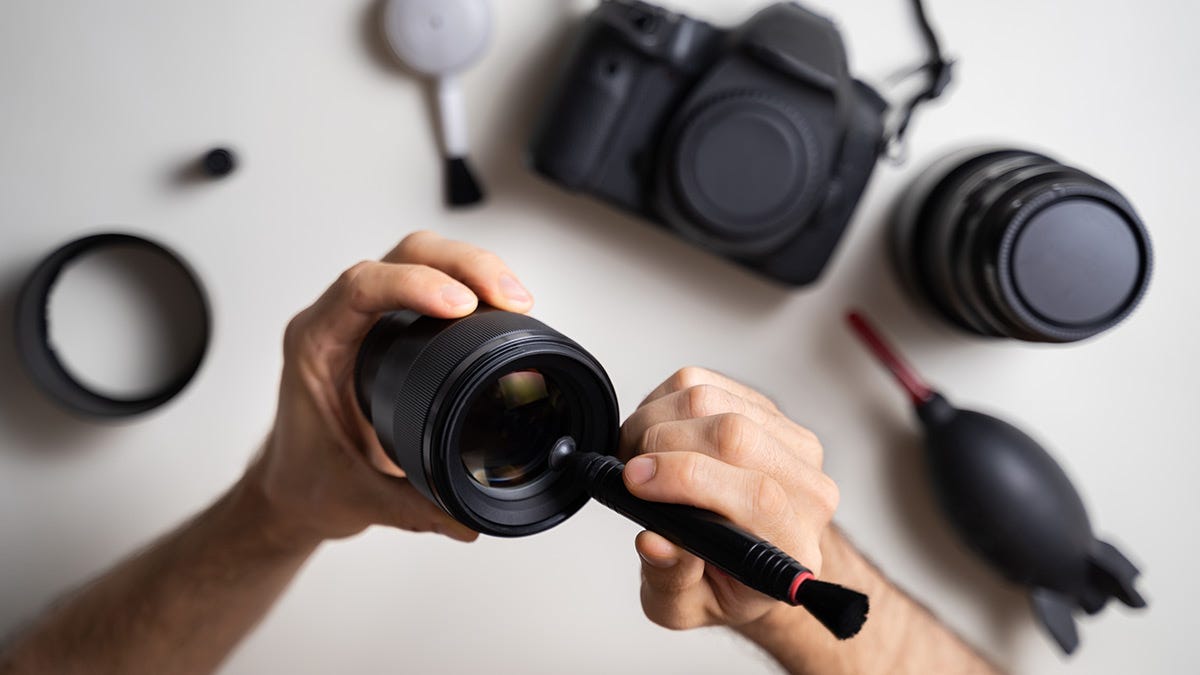
To clean your camera lens safely, use a blower to remove dust and a soft, lint-free cloth for smudges. Employ lens cleaning fluid sparingly for stubborn residues.
Maintaining a crystal-clear camera lens is pivotal for photographers, from hobbyists to professionals. How to Clean Camera Lens. A spotless lens can significantly enhance image quality, capturing shots with pristine clarity. But, while cleaning is necessary, it’s equally important to do it correctly to avoid scratches and other damage.
This brief guide aims to navigate you through the safe cleaning process, ensuring you keep your camera lens in immaculate condition without risking harm. With the right tools and gentle, precise techniques, safeguarding your lens’ integrity while striving for spotless optics becomes an uncomplicated task. Let’s break down the steps to achieve a sparkling lens that keeps your photographs sharp and stunning.
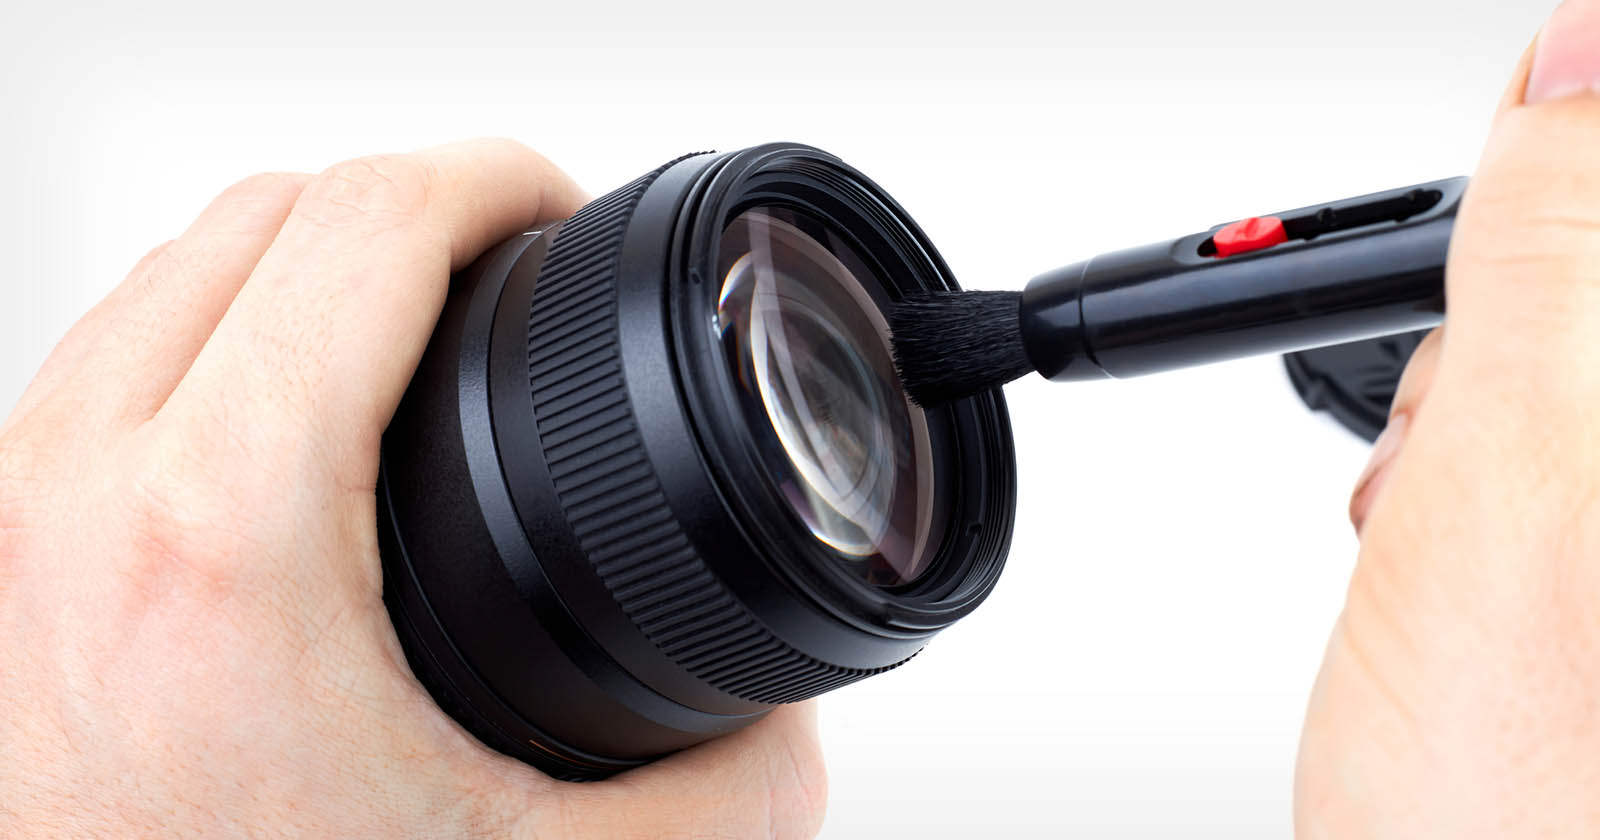 Credit: petapixel.com
Essential Tools For Lens Cleaning
Safeguarding your camera lens requires precision and the right tools. Opt for a high-quality lens cleaning kit, which typically includes a microfiber cloth, blower, and soft brush, to effectively remove dust and smudges without scratching the delicate glass.
Caring for your camera is a task that combines precision with a touch of tenderness. The heart of your photographic gear, the lens, demands regular upkeep to render those crystal-clear images we all strive for. And when it comes to lens cleaning, using the right tools is as crucial as the cleaning process itself.
Lens Cleaning Brushes
A delicate approach is key when you’re dealing with an intricate piece of equipment like your camera lens. Here’s where a lens-cleaning brush comes into play:
- Soft-bristled brush: Effortlessly sweeps away dust and sand without scratching the lens.
- Retractable design: Keeps the bristles clean and intact when not in use.
- Non-abrasive material: Ensures minimal risk of damaging lens coatings.
Microfiber Cloths
For a streak-free shine that maintains your lens’s integrity, nothing matches a high-quality microfiber cloth. Its secret lies in the fine threads that can pick up oils and dust without leaving residues or scratches. Unlike regular fabric, these cloths are designed to trap dirt and moisture, ensuring a thorough cleanse that’s both gentle and effective.
Lens Cleaning Solutions
Selecting the proper cleaning solution keeps your lens free from spots and fingerprints. When you use one:
- Alcohol-free formula: Prevents damage to lens coatings and ensures no streaking after cleaning.
- Spray bottle: Allows for a fine mist application, providing control over the amount used and preventing over-saturation.
- Optical quality: This guarantees that the solution is suitable for high-grade lenses and won’t degrade their performance over time.
Air Blowers
An indispensable tool for any photographer, the air blower is your first line of defense. It removes particles from your lens surface without any physical contact, which means:
- Powerful airflow: Quickly dislodges loose particles, even those stubborn bits tucked in crevices.
- Silicone construction: Respects the delicate surfaces, blowing away debris with a gentle puff rather than a scratch-inducing scrape.
Remember, the longevity of your camera lens hinges on the proper care and maintenance. By utilizing these essential tools, not only will you preserve the quality of your lens, but you’ll also ensure that each shot you take is as impeccable as the first.
Keep up with these simple steps, and you are sure to have a lens that will serve you well for all those memorable captures.
Step-by-step Guide To Cleaning Your Lens
Discover the proper way to cleanse your camera lens with our step-by-step guide, ensuring the clarity and longevity of your photography equipment. Master the art of lens maintenance with our easy-to-follow instructions, safeguarding your gear from scratches and damage.
Capturing flawless images begins with a pristine camera lens. Dirt, dust, and fingerprints can mar your photos, but proper cleaning ensures your lens remains in top-notch condition. Follow this simple step-by-step guide to guarantee your lens is spotless and your pictures are clear.
Gather Your Cleaning Supplies
Before diving into the cleaning process, make sure you have all the necessary tools at hand:
- Lens Cleaning Solution: This specialized fluid is formulated to safely clean lens surfaces without damaging them.
- Microfiber Cloth: A gentle cloth that won’t scratch your lens while wiping away grime.
- Lens Brush: An ultra-soft brush designed to remove dust without leaving residue.
- Air Blower: A tool for dislodging debris from the lens without physical contact.
Inspecting The Lens
A keen eye is crucial in identifying all the spots that need your attention:
Begin by examining your lens in good lighting to spot any smudges, dust, or fingerprints. Remember, the less often you touch the lens, the fewer cleanings it will need. An occasional thorough visual check helps you pinpoint exactly which areas of your lens require cleaning, ensuring you don’t overlook any subtle marks.
Use An Air Blower
Dislodge loose dust without touching the lens:
- Initial Puff: Aim the air blower away from the lens first to avoid injecting dust trapped inside the tool.
- Gentle Blowing: Carefully direct a stream of air onto the lens surface, paying close attention to the edges where particles are prone to collect.
Carefully Brush The Lens
When a soft touch is needed, brushing is your best bet:
- Light Strokes: Gently sweep across the lens with your lens brush, allowing the fine bristles to lift away remaining dust.
- Circular Motion: Use a circular pattern to ensure all areas are covered, but avoid applying pressure which could scratch the lens.
Wipe With A Microfiber Cloth
Removing smudges is crucial for a crystal-clear lens:
After dusting, use a clean microfiber cloth to softly wipe away any lingering smudges or fingerprints. Employ a gentle circular motion across the lens surface, ensuring you move from the center towards the edges. The key is to repeat the motion until the glass is clear, not pressing too hard to avoid scratches.
Apply Lens Cleaning Solution
For the more stubborn blemishes, the right solution is your ally:
- Drop Wisely: Place a small amount of lens cleaning solution onto your microfiber cloth—not directly on the lens—to prevent fluid damage.
- Even Application: Spread the solution over the lens in a smooth, circular motion, being cautious not to oversaturate any area.
By adhering to this guide, you’ll not only maintain the integrity and performance of your camera lens but also enhance the quality of your photography. Remember to clean your lens regularly and with care, keeping these steps in mind each time you spot a blemish.
Your rewarding efforts will be reflected in the brilliance of your captured moments.
Avoiding Common Cleaning Mistakes
Maintaining the clarity of your camera lens requires a gentle touch and the right tools. Discover the art of safely removing smudges and dust without scratching or damaging this delicate equipment.
Avoiding Excessive Force
Cleaning your camera lens requires a gentle hand. Using too much pressure can cause scratches or other damage.
- Apply Light Pressure:
Treat the lens surface as if it were fragile. Excessive force can result in irreparable scratches.
- Use Soft Materials:
Always opt for a lens-cleaning cloth or a lens-specific brush. Rough fabrics can harm the delicate coatings on your lens.
Choosing The Right Cleaning Solution
Selecting an appropriate cleaning solution is crucial for maintaining the integrity of your camera lens.
- Lens-Specific Solutions:
Stick to solutions made for camera lens cleaning. Household cleaners might contain harsh chemicals that could strip away the lens coating.
- Avoiding Alcohol and Acetone:
Some substances, like alcohol, can damage a lens’ coatings. Ensure your cleaning fluid is alcohol-free.
Ditching Dust Before Wiping
Wiping your lens without removing dust particles first is a common pitfall.
- Use a Blower First:
Begin with a blower to eject any dust or debris. Direct contact with grit while wiping can lead to scratches.
- Brush Off Loose Dirt:
A soft-bristled brush can delicately displace any leftover particles after blowing. This step minimizes the risk of scraping your lens during the cleaning process.
Preventing Liquid Contact With Lens Edges
Liquid seepage into a lens can cause significant issues.
- Apply Cleaner to Cloth:
To avoid fluid from sneaking into the lens’s edges, dampen your cleaning cloth rather than the lens itself.
- Moderation is Key:
Use minimal amounts of liquid. Excess solutions can travel to unwanted areas, potentially leading to damage.
Maintaining your camera lens involves understanding what not to do as much as knowing the correct procedures. Keep your approach gentle, choose your cleaning products wisely, deal with dust delicately, and shield the lens edges from liquids. These practices will not only keep your lens crystal clear but also extend its life and functionality.
When To Seek Professional Lens Cleaning
Regular cleaning maintains your camera lens quality, but intricate issues call for a professional touch. Seek expert cleaning when stubborn dirt persists or precision tools are needed to prevent damage.
Taking care of your camera lens is crucial for capturing sharp and clear images. Just like any other sophisticated instrument, a camera lens requires regular maintenance to ensure its longevity and performance. However, there are certain circumstances where amateur cleaning might do more harm than good, and seeking professional lens cleaning becomes imperative.
Recognizing Stubborn Lens Issues
Occasionally, a lens may develop problems that simple cleaning routines can’t solve. These persistent issues often require a professional’s touch:
- Persistent dust or particles:
If after a careful, thorough cleaning, you still spot dust within the lens elements, it may be a sign that the debris has worked its way inside, which is best addressed by a technician.
- Fungal growth:
Humidity can lead to fungal growth on or within the lens. Fungal spores not only affect image quality but can also cause permanent damage over time.
- Scratches:
While minor surface scratches might not impact photo quality significantly, deeper scratches should be evaluated professionally to prevent further damage or to explore restoration options.
When Diy Cleaning Isn’t Enough
Despite your best efforts, there are instances where a DIY cleaning session might not cut it:
- After a lens encounters harsh environments:
If your lens has been exposed to salty sea spray, desert dust, or industrial pollutants, specialized cleaning by a professional can ensure all corrosive or abrasive particles are removed without causing damage.
- Intensive usage:
Professional photographers or those using their equipment in high-intensity settings may find their lenses require more rigorous maintenance that goes beyond standard cleaning protocols.
Maintaining Your Lens Post-cleaning
Post-cleaning, store your camera lens in a dust-free area to prevent debris accumulation. Regular checks for smudges and proper cap placement ensure lasting lens clarity and protection.
Keeping your camera’s lens pristine isn’t just about the initial cleaning; proper maintenance ensures lasting clarity and functionality. After you’ve meticulously wiped off fingerprints, dust, and smudges, it’s crucial to sustain that spotlessness. Here’s how you can keep your lens in peak condition post-cleaning.
Store Lenses Properly
Storing your camera lenses correctly is pivotal to safeguarding their clean state. You’ve done the hard work of cleaning them; now make sure they stay that way by:
- Case Storage: Always stow your lenses in a padded case or bag. These specifically designed cases protect against knocks and scratches that can occur when you’re on the go.
- Humidity Control: Use silica gel packets or a dehumidifying cabinet to minimize moisture, which can lead to fungal growth or lens degradation over time.
- Caps On: Don’t forget to replace both the front and rear lens caps. The caps act as a barrier against dust and other potentially harmful particles.
Regular Inspections
Routine check-ups on your lens can pre-empt potential issues and maintain its pristine condition. Taking a few moments regularly can save you a lot of trouble later on.
- Dust Watch: Keep an eye out for dust accumulation, especially after outings. Swiftly blow away any particles with a blower bulb; this simple step can prevent abrasive damage during your next cleaning.
- Smudge Patrol: Quickly address new smudges or fingerprints. A gentle wipe with a microfiber cloth can do the trick without involving a full cleaning kit each time.
- Mount Check: Inspect the lens mount for grit before attaching the lens to your camera; ensuring this area is clean helps maintain the integrity of the internal camera mechanisms.
Maintaining your camera lens after cleaning it isn’t just about preserving image quality, it’s about extending the life of a valuable piece of equipment. By incorporating these habits into your workflow, you’ll find your gear performing at its best whenever you’re ready to capture that perfect shot.
 Credit: www.studiobinder.com
Frequently Asked Questions On How to Clean Camera Lens Safely
What Is The Best Way To Clean A Camera Lens?
The best way to clean a camera lens involves using a soft, lint-free cloth or a lens brush to gently remove surface dust. If necessary, apply a few drops of lens cleaning solution to the cloth and wipe in a circular motion from center to edge.
Can I Use Alcohol To Clean My Camera Lens?
It’s not recommended to use alcohol on camera lenses as it can damage lens coatings. Specialized lens cleaning solutions are safer choices. Ensure they’re designed for camera lenses and used sparingly.
How Often Should I Clean My Camera Lens?
Clean your camera lens whenever you notice dirt or fingerprints. Regular checks ensure optimal performance and image quality. For daily users, a weekly dusting is advisable, and a thorough cleaning monthly or as needed.
What Should I Avoid When Cleaning My Camera Lens?
Avoid using rough materials, touching the lens with your fingers, and using excessive liquid that could seep into the lens. Instead, opt for gentle, specialized tools and solutions designed for lens care.
What is the best way to clean a camera lens?
The best way to clean a camera lens involves carefully removing any dust or debris with a blower or soft brush first, then using a lens-specific solution and a microfiber cloth to gently wipe the lens surface in a circular motion. Avoid using excessive pressure to prevent damage.
Can you use alcohol wipes on camera lens?
It’s generally not recommended to use alcohol wipes on a camera lens as the harsh chemicals can damage the lens coatings. Instead, opt for a cleaning solution designed specifically for camera lenses.
How do you clean a blurry camera lens?
To clean a blurry camera lens, start by gently removing any external debris or dust. Next, apply a few drops of lens cleaning solution to a microfiber cloth and gently wipe the lens in a circular motion. Avoid applying the solution directly to the lens to prevent liquid damage.
Can I clean camera lens with water?
While water can be used in a pinch, it’s not ideal for cleaning camera lenses as it may leave spots or not fully remove oily residues. For best results, use a dedicated lens cleaning solution or distilled water lightly applied to a microfiber cloth.
Conclusion
Maintaining a clean camera lens is crucial for capturing crystal-clear images. By following the steps outlined, you’ll protect your gear and enhance photo quality. Remember, regular maintenance and gentle handling are your lens’s best friends. Embrace these simple practices and let your photography continue to shine.
